Troška teórie na začiatok
Možno trochu zavádzajúci názov blogu by sa dal asi zrozumiteľnejšie preložiť ako počas trvania šprintu mockujeme REST-API. Každopádne sa v tomto článku detailnejšie pozrieme na dva Java frameworky, ktoré simulujú REST API (wiremock a hoverfly). A jeden, v dnešnej dobe veľmi populárny testovací a validačný framework, rest-assured.
Častokrát na začiatku šprintu, developeri ešte nemajú naprogramovaný servis, ktorý bude po jeho dokončení testovaný QA tímom, aby mohol byť dodaný pre front-endový tím, ktorý ho bude využívať. Keďže celé QA oddelenie je súčasťou agilného engineering tímu, zúčastňuje sa celého životného cyklu vývoja. Načo teda čakať na development oddelenie, keď si QA inžinieri môžu pomôcť nachystaním testov vopred.
Na testovanie použijeme JUnit framework a rest-assured, ktorý bude po dokončení servisov na oddelení developmentu možné nezmenený použiť aj na testy finálnych REST-servisov.
Na mockovanie REST servisov použijeme wiremock a hoverfly. Nechcem v tomto článku porovnávať oba frameworky. Oba majú niektoré veľmi užitočné funkcie a stále sa vyvíjajú. Takže je len na vás, aby ste zistili, ktorý z nich najlepšie zodpovedá vášmu projektu.
Na demonštračné účely si teda predstavme jeden šprint, počas ktorého sa má vyvinúť back-end, ako REST servisy, ktoré budú obsahovať:
- Autorizačný servis na autorizáciu používateľa menom a heslom, ktorý bude generovať autorizačný token – bearer, ktorým sa v hlavičke headri každého requestu budeme autorizovať.
- Servis, ktorý pridá nové auto do firemnej flotily áut.
- Servis, ktorý umožní vyhľadávanie áut.
Príprava tasku pred zaradeníim do sprintu
Štandardne, pred začatím šprintu na „taskingu“ vznikne všeobecná dohoda engineering tímu, čo sa bude počas šprintu vyvíjať. Obyčajne potom Java architekt na firemnej wiki stránke pripraví analýzu budúceho REST back-endu. Napríklad takto:
Autenticate
POST
 /api/sessions
params:
1.	User
2.	Password

JSON response (200)
{
  "idToken": "eyJ0eXAiOiJKV1QiLCJhbGciOiJIUzI1NiJ9 ",
  "accessToken": "H2NzYWGeSSdidYU6",
  "refreshToken": "12XirLmjcPDMW9ECnm2m26tEBgPmmLBjByxoQHP5hHnA0",
  "tokenType": "BEARER",
  "expires_in": 28800
}
Create a new car
POST
/carstub

JSON for creating car
{
   "client": "IBM",
   "make": "Nissan",
   "model": "Tiida",
   "year": 2004,
   "ccm": 1600,
   "fuel": "Benzin",
   "seats": 5,
   "weight": 1200
}
response (201)
body
"New fleet member has been stored"
Searching car by name
GET
/carstub?q=Aston

JSON response (200)
{
	"client" : "IBM",
	"make" : "Aston Martin",
	"model" : "DB9",
	"year" : 2004,
	"ccm" : 1200,
	"fuel" : "Benzin",
	"seats" : 3,
	"weight" : 900
}
Developeri teda budú vyvýjať back-end, ktorý
- získa autorizačný token po prihlásení menom a heslom (POST, /api/sessions)
- založí nového člena firemnej flotily áut (POST, /carstub)
- umožní vyhľadávanie auta podľa názvu (GET, /carstub?q=XXX)
WireMock
Pred prvým použitím frameworkov zapíšeme dependencies do pom.xml (maven termín – linka, alebo poznámk apod čiarou). Všimneme si použite všetkých troch frameworkov:
- wiremock
- io.rest-assured
- io.specto – hoverfly
- junit
- tempus-fugit- paralell test runpom.xml
<project xmlns="http://maven.apache.org/POM/4.0.0" xmlns:xsi="http://www.w3.org/2001/XMLSchema-instance" xsi:schemaLocation="http://maven.apache.org/POM/4.0.0 http://maven.apache.org/xsd/maven-4.0.0.xsd">
  <modelVersion>4.0.0</modelVersion>
  <groupId>com.rhe.qa.blog</groupId>
  <artifactId>robime.it</artifactId>
  <version>0.0.1-SNAPSHOT</version>
  <name>REST Assured with mock Serialization</name>
  <dependencies>
		<dependency>
			<groupId>com.github.tomakehurst</groupId>
			<artifactId>wiremock</artifactId>
			<version>2.1.12</version>
		</dependency>
		<dependency>
			<groupId>junit</groupId>
			<artifactId>junit</artifactId>
			<version>4.12</version>
		</dependency>
		<dependency>
			<groupId>io.rest-assured</groupId>
			<artifactId>rest-assured</artifactId>
			<version>3.0.1</version>
		</dependency>
        <dependency>
            <groupId>com.google.code.tempus-fugit</groupId>
            <artifactId>tempus-fugit</artifactId>
            <version>1.1</version>
        </dependency>
        <dependency>
            <groupId>io.specto</groupId>
            <artifactId>hoverfly-java</artifactId>
            <version>0.3.6</version>
        </dependency>
	</dependencies>
</project>
Vytvárame stub I. (Car.java)
Pomocou wiremock-u si teda vytvoríme vlastný, mockovaný REST servis, nad ktorým neskôr vyrobíme JUnit testy. Najskôr ale ukážka pomocnej triedy, ktorou definujeme členov našej firemnej auto-flotily.
public class Car {

    String client;
    String make;
    String model;
    int year;
    int ccm;
    String fuel;
    int seats;
    int weight;

    public Car() {
    }

    public Car(final String client, final String make, final String model, final int year, final int ccm, final String fuel, final int seats, final int weight) {
        this.client = client;
        this.make = make;
        this.model = model;
        this.year = year;
        this.ccm = ccm;
        this.fuel = fuel;
        this.seats = seats;
        this.weight = weight;
    }
    public String getClient() {
        return this.client;
    }
    public String getMake() {
        return this.make;
    }
    public String getModel() {
        return this.model;
    }
    public int getYear() {
        return this.year;
    }
    public int getCcm() {
        return ccm;
    }
    public void setClient(final String client) {
        this.client = client;
    }
    public void setCcm(final int ccm) {
        this.ccm = ccm;
    }
    public String getFuel() {
        return fuel;
    }
    public void setMake(final String make) {
        this.make = make;
    }
    public void setModel(final String model) {
        this.model = model;
    }
    public void setYear(final int year) {
        this.year = year;
    }
    public void setFuel(final String fuel) {
        this.fuel = fuel;
    }
    public int getSeats() {
        return seats;
    }
    public void setSeats(final int seats) {
        this.seats = seats;
    }

    public int getWeight() {
        return weight;
    }

    public void setWeight(final int weight) {
        this.weight = weight;
    }

    @Override
    public String toString() {
        return "Car (fleet member for " + client + " ) is a " + this.make + " " + this.model + " " + this.year + " " + this.ccm + " " + this.fuel + " " + this.seats + " " + this.weight;
    }
}
Vytvárame stub II. (CarStub.java)
Trieda CarStub.java už vytvára mockované servisy na pridanie a vyhľadávanie.
import static com.github.tomakehurst.wiremock.client.WireMock.aResponse;
import static com.github.tomakehurst.wiremock.client.WireMock.get;
import static com.github.tomakehurst.wiremock.client.WireMock.post;
import static com.github.tomakehurst.wiremock.client.WireMock.stubFor;
import static com.github.tomakehurst.wiremock.client.WireMock.urlEqualTo;

public class CarStub {

    public CarStub() {
    }

    public void createCarStub() {

        // post - OK
        stubFor(post(urlEqualTo("/carstub")).willReturn(aResponse().withStatus(201)
                .withBody("New fleet member has been stored")));

        // get - OK
        stubFor(get(urlEqualTo("/carstub?q=Aston")).willReturn(

        aResponse().withStatus(200)
                .withHeader("Content-Type", "application/json")
                .withBody("{\"client\" : \"IBM\",\"make\" : \"Aston Martin\", \"model\" : \"DB9\", \"year\" : 2004, \"ccm\" : 1200, \"fuel\" : \"Benzin\", \"seats\" : 3, \"weight\" : 900}")));

        // get - OK
        stubFor(get(urlEqualTo("/carstub?q=Nissan")).willReturn(

        aResponse().withStatus(200)
                .withHeader("Content-Type", "application/json")
                .withBody("{\"client\" : \"IBM\",\"make\" : \"Nissan\", \"model\" : \"Tiida\", \"year\" : 2016, \"ccm\" : 1600, \"fuel\" : \"Benzin\", \"seats\" : 5, \"weight\" : 1200}")));

        // get - FAILED
        stubFor(get(urlEqualTo("/carstub?q=Not-Existing-Car")).willReturn(

        aResponse().withStatus(404)
                .withHeader("Content-Type", "application/json")
                .withBody("{}")));

    }
}
JUnit testy proti wiremock-stubu
Počas behu testov sa wiremock naštartuje ako JUnit @Rule.
@Rule
public WireMockRule wireMockRule = new WireMockRule(port);
Tu stoji za povšimnutie, že port na ktorom bude mock servis počúvať je neskôr generovaný náhodne, aby sme umožnili paralelný beh testov.
@RunWith(ConcurrentTestRunner.class)
public class CarTests {
    int randomPort = ThreadLocalRandom.current().nextInt(9800, 9900 + 1);
    final int port = randomPort;
    Car myCar = new Car("IBM", "Nissan", "Tiida", 2004, 1600, "Benzin", 5, 1200);

    CarStub myCarStub = new CarStub();

    @Rule
    public WireMockRule wireMockRule = new WireMockRule(port);

    @Test
    public void testCarSerialization() {
        final Header authHeader = new Header("Authorization", "bearer " + this.bearer);
        myCarStub.createCarStub();
        given().contentType("application/json")
                .header(authHeader)
                .body(myCar)
                .and()
                .log()
                .body()
                .when()
                .post("http://localhost:" + port + "/carstub")
                .then()
                .assertThat()
                .body(equalTo("New fleet member has been stored"))
                .assertThat()
                .statusCode(201);
    }
    @Test
    public void testCarDeserializationAston() {
        myCarStub.createCarStub();
        final Car myDeserializedCar = get("http://localhost:" + port + "/carstub?q=Aston").as(Car.class);
        System.out.println(myDeserializedCar.toString());
        Assert.assertEquals("Check the car make", myDeserializedCar.getMake(), "Aston Martin");
    }
    @Test
    public void testCarDeserializationNotExists() {
        myCarStub.createCarStub();
        final Car myDeserializedCar = get("http://localhost:" + port + "/carstub?q=Not-Existing-Car").as(Car.class);
        System.out.println(myDeserializedCar.toString());
        Assert.assertEquals("Check the car make", myDeserializedCar.getMake(), null);
        final int statusCode = get("http://localhost:" + port + "/carstub?q=Not-Existing-Car").getStatusCode();
        Assert.assertEquals("Check the Stauscode", statusCode, 404);

    }
    @Test
    public void testCarDeserializationNissan() {
        myCarStub.createCarStub();
        final Car myDeserializedCar = get("http://localhost:" + port + "/carstub?q=Nissan").as(Car.class);
        System.out.println(myDeserializedCar.toString());
        Assert.assertEquals("Check the car make", myDeserializedCar.getMake(), "Nissan");
    }
    @Test
    public void testCarNotFoundStausCode() {

        myCarStub.createCarStub();

        given().contentType("application/json")
                .when()
                .get("http://localhost:" + port + "/carstub?q=Not-Existing-Car")
                .then()
                .assertThat()
                .assertThat()
                .statusCode(404);
    }
}
Paralelný beh JUnit testov proti wiremock – Eclipse

Hoverfly framework
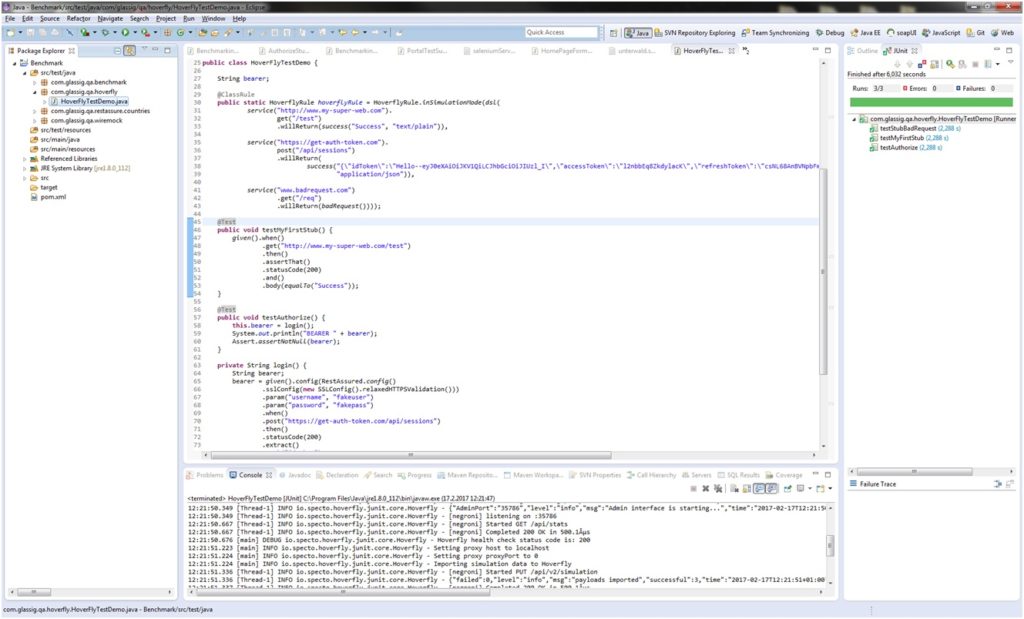
Tento framework je použitý hlavne z didaktických dôvodov. Vytvoril som v ňom servis na autorizáciu poslaním (post) username a password. Rovnako som mohol použiť aj wiremock, ale chcel som demonštrovať ako sa v ňom dajú použiť aj “fejkové” URL, dokonca cez SSL.
@RunWith(ConcurrentTestRunner.class)
public class HoverFlyTestDemo {
    String bearer;

    @ClassRule
    public static HoverflyRule hoverflyRule = HoverflyRule.inSimulationMode(dsl(
            service("http://www.my-super-web.com").
                    get("/test")
                    .willReturn(success("Success", "text/plain")),

            service("https://get-auth-token.com").
                    post("/api/sessions")
                    .willReturn(
                            success("{\"idToken\":\" eyJ0eXAiOiJKV1QiLCJhbGciOiJIUzI1NiJ9\",\"accessToken\":\"l2nbbEq8ZkdylacK\",\"refreshToken\":\"csNL68AnBVNpbFmGlYJNFw6YhDeAklwGSDAylnCLPWDUI\",\"tokenType\":\"BEARER\",\"expires_in\":28800}",
                                    "application/json")),

            service("www.badrequest.com")
                    .get("/req")
                    .willReturn(badRequest())));

    @Test
    public void testMyFirstStub() {
        given().when()
                .get("http://www.my-super-web.com/test")
                .then()
                .assertThat()
                .statusCode(200)
                .and()
                .body(equalTo("Success"));
    }
    @Test
    public void testAuthorize() {
        this.bearer = login();
        System.out.println("BEARER " + bearer);
        Assert.assertNotNull(bearer);
    }
    private String login() {
        String bearer;
        bearer = given().config(RestAssured.config()
                .sslConfig(new SSLConfig().relaxedHTTPSValidation()))
                .param("username", "fakeuser")
                .param("password", "fakepass")
                .when()
                .post("https://get-auth-token.com/api/sessions")
                .then()
                .statusCode(200)
                .extract()
                .path("idToken");
        return bearer;
    }
    @Test
    public void testStubBadRequest() {
        given().
                when()
                .get("http://www.badrequest.com/req")
                .then()
                .assertThat()
                .statusCode(400);
    }

}
Hoverfly sa pred zbehnutím JUnit testov aktivuje pomocou rule – @ClassRule. Vlastný test je v metóde testAuthorize(), ktorá demonštruje získanie tokenu cez SSL na fiktívnej URL. Takto získaný bearer token potom môžu ostatné testy pridávať do headrov dalších requestov. Napríklad:
final Header authHeader = new Header("Authorization", "bearer " + this.bearer);
        given().when().header(authHeader)
                .get("http://www.my-super-web.com/test")
                .then()
                .assertThat()
                .statusCode(200)
                .and()
                .body(equalTo("Success"));
Paralelný beh JUnit testov proti hoverfly


